Welcome to Moda Fabrics!
July. Christmas. Ready.
July. Christmas. Ready.
Published:
Jul 31 2015 - 07:00
Okay, maybe not completely. Probably not at all. (Someone - walks like a duck... talks like a duck... - has "borrowed" everything I've made so far for "other purposes".)
So I may consider hiding the little bags I made for today.
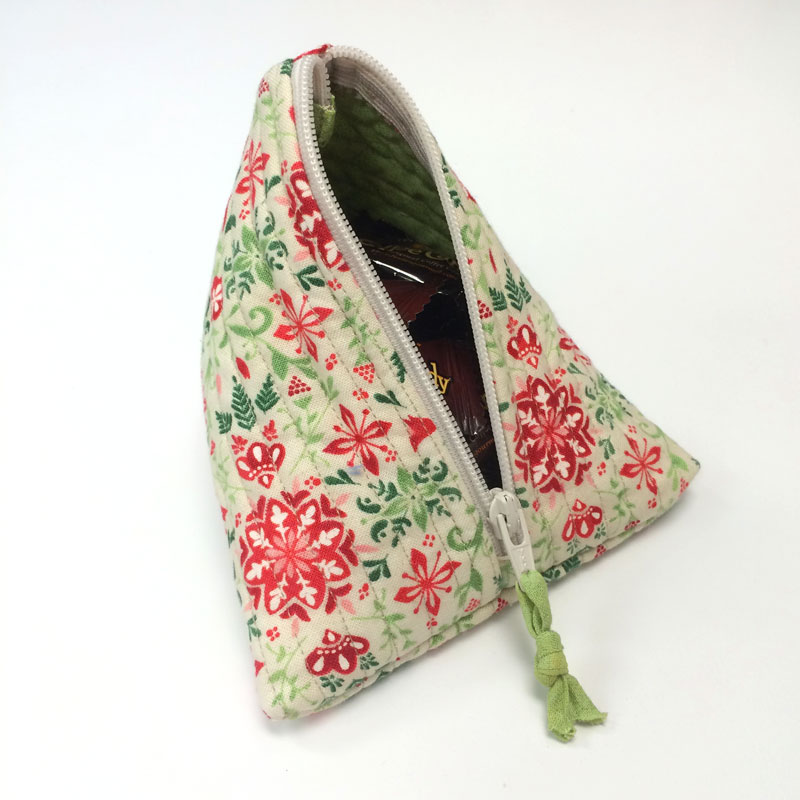
Bags like this have been around for years and years; there have been patterns and tutorials, and everybody has a little bit different take on what they like to do. I've made and used this kind of bag for... well, years and years. I've made them with leftover blocks, rectangles pieced with leftover parts, and I've even pieced something specifically to use for this purpose. Because the shape is so terrific, I've also used this shape for pincushions - some that look like chickens and others that don't.
I hadn't made any bags in a few years but then Peta Peace of Australia showed this picture on Instagram...
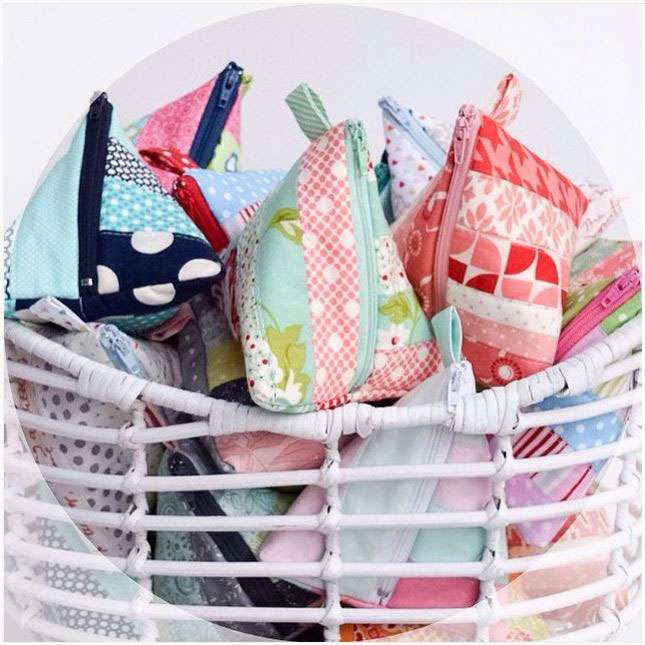
The image stayed with me because it reminded me of some of the pictures I'd seen - and pinned - on Pinterest of advent calendar ideas and last-minute-gift ideas. When I went back to find the picture for this post, it turns out that Peta had made the basketful of bags for gifts using the terrific tutorial by Lisa and Sarah of A Spoonful of Sugar - the wonderful Aussie-based blog where I found the Charm Square tray I shared a few weeks ago. (Their tutorials - Triangle Pouch and Patchwork Triangle Pouch.)
After seeing their tutorials, I thought about using a picture of the bags I made and linking to them because they're terrific. But they're not very much alike other than the shape. Next time, right?
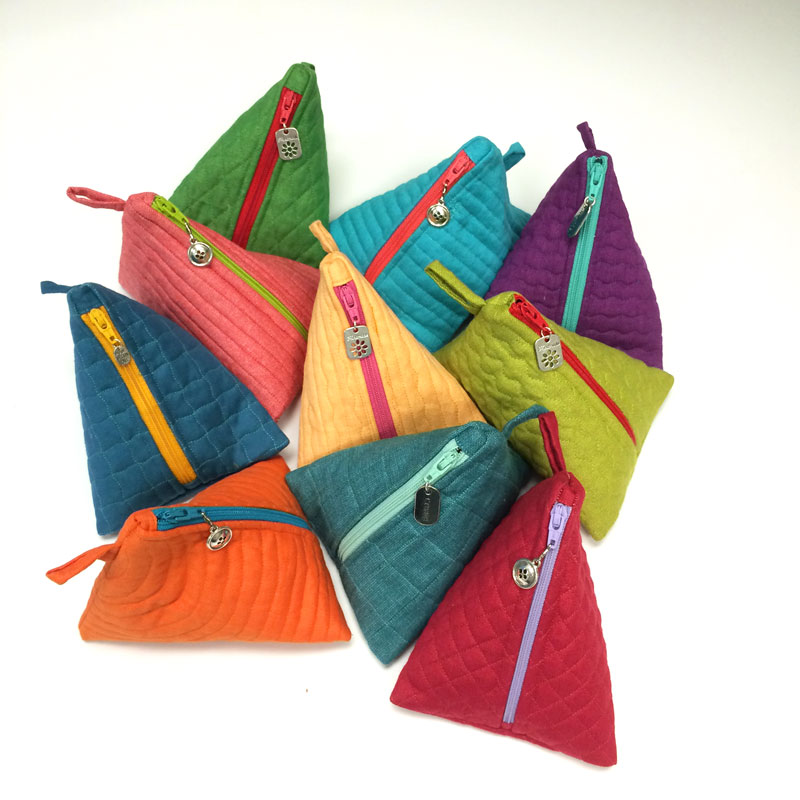
Did I mention that the other inspiration for this particular project was a stack of "leftover" pieces of Moda Crossweaves that Chelair left on my desk? Yes... I was smitten. (Again.) (Still.)
The first several bags were made with squares from a Layer Cake of Evergreen by Basic Grey. My intent had been to use a single Layer Cake to make at least 21 bags - one square for the outside and one square for the lining. Since the size was perfect for my purpose, I stayed with the same size piece after deciding to use - being sidetracked by - the crossweaves.
This is what you'll need for one bag:
- 1 piece of fabric - at least 8 1/2" x 10" - for the outside of the bag.
- From the piece, cut 1 rectangle - 6 1/2" x 10". Then from the 2" strip, cut 2 rectangles - 2" x 2 1/2" - and save the remainder.
- 1 piece of fabric - at least 6 1/2" x 10" - for the lining of the bag.
- 1 piece of batting - 6 1/2" x 10". I used leftover pieces of batting - 100% cotton and 50% cotton/50% bamboo.
- coordinating or contrasting thread for quilting - in your preferred weight
- 1 zipper - at least 7" long
- 1 zipper pull - optional
Using the fabric and batting rectangles, make a "quilt sandwich" of the two layers of fabric and the batting, and quilt as desired.
Trim the sides of the quilted rectangle so they are straight, even and "clean". I trimmed the rectangle to measure 6" x 9 3/4".
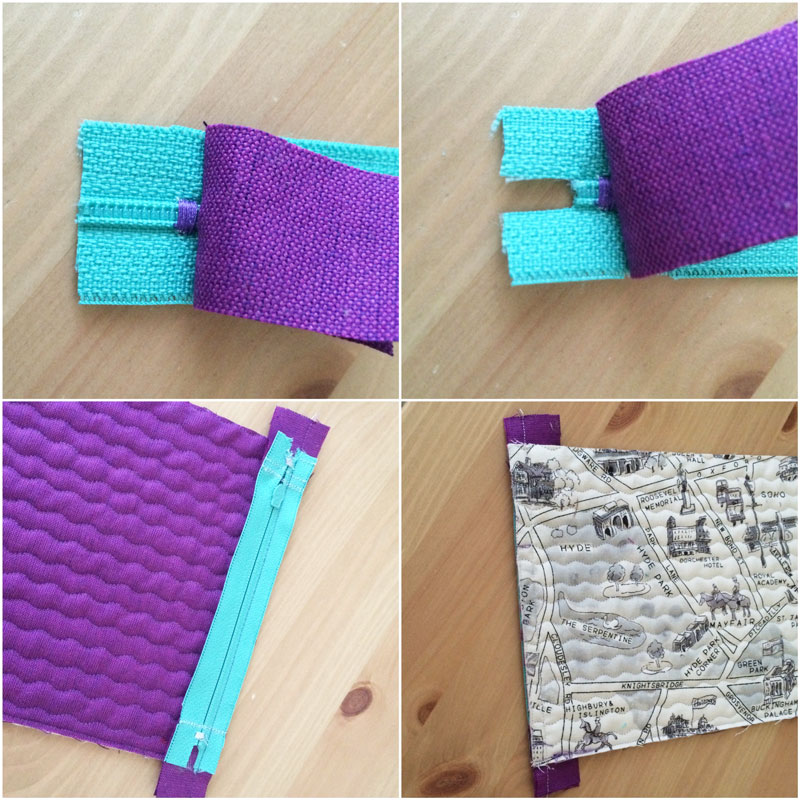
The zipper. The first thing I like to do is "remove" the metal parts on the zipper tape. Start at the bottom of the zipper - about 1" above the bottom metal cross-bar, zig-zag stitch across the zipper-coil as shown below.
Using one of the 2" x 2 1/2" rectangles, fold it in half to find the center - 1 1/4" in from the ends. Place the fold approximately 1/4" inside the zig-zap stitching and stitch across the rectangle. (The upper left image in the next picture might help.)
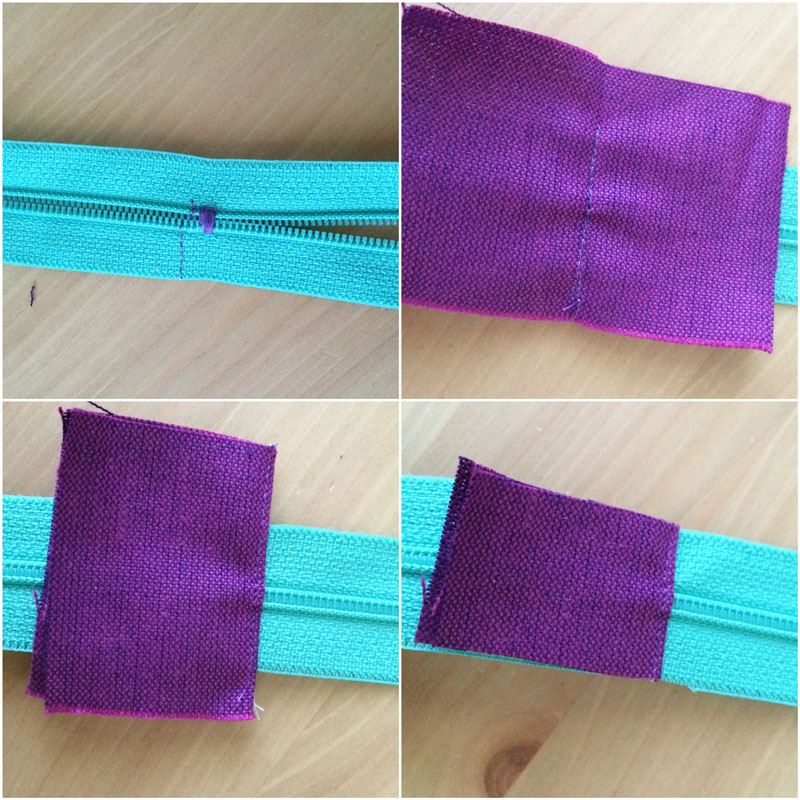
Fold the rectangle over and top-stitch along the edge. Trim the sides even with the zipper.
To repeat this on the other end of the zipper - measure 5" up from the folded edge and make a mark on the zipper tape. This is the point for the zig-zag stitching. Now measure 4 3/4" up from the folded edge and mark the zipper tape - this is the placement point for the fold on the other end.
Before stitching... Make sure the zipper is open - that the zipper pull is between the two stitching lines. (Yes, I made that mistake... that's how I know this.)
Fold back the fabric to expose the bottom of the tape. Using the tips of a sharp pair of scissors, remove the plastic zipper coil as shown, leaving approximately 1/4" of the zipper.
When both sides are complete, the zipper should measure 4 3/4" from fold to fold.
With the wrong-side of the zipper facing the outer fabric, align the edge of the zipper tape with the edge of the fabric. The ends will extend past the edge as shown.
Using your preferred width and zipper foot, sew the zipper to the quilted rectangle.
Optional: Overcast or serge the edge of the zipper.
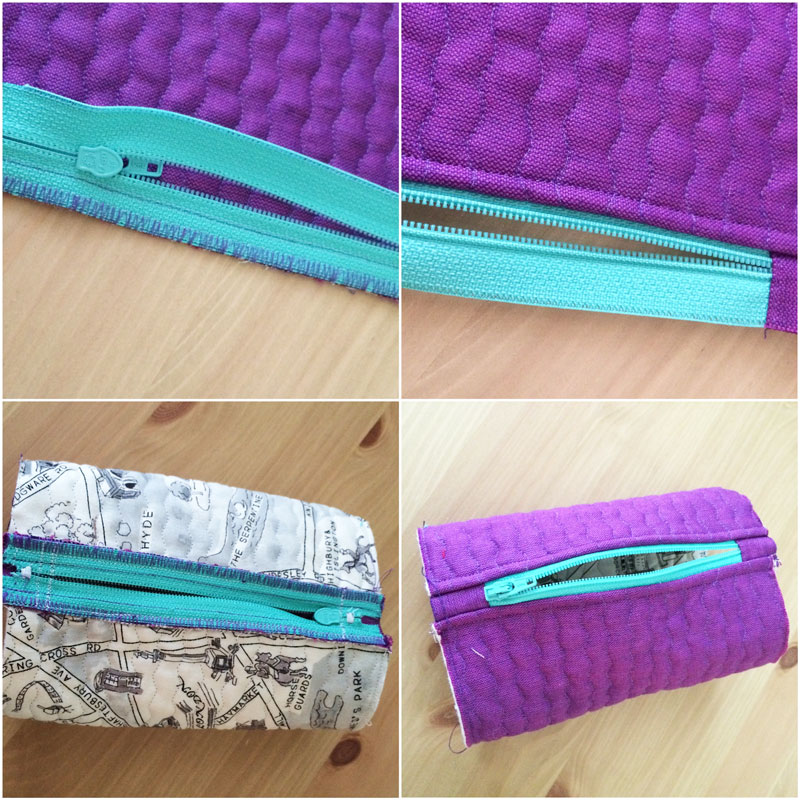
Optional: Top-stitch along the edge of zipper as shown. Full disclosure - doing the first side of the top-stitching is easy. Zip. Done. The second side... not so much. The bag is joined so you're working in the middle of a small cylinder... it gets a little tight. Going slowly, I could stitch about 3/4 of the length before it became too difficult to manage. So I "finished" the seam by coming from the other direction and overlapping the stitching. Once finished, you really have to look to find the join.
Repeat on the other side of the bag.

On the edge of the bag with the bottom of the zipper, fold the cylinder to center the zipper. Pin to secure. Using a 3/8" seam allowance, stitch across the opening.
Optional: Overcast or serge the seam.
With right sides together, fold the 2" x 5" rectangle lengthwise and stitch a generous 1/4" from the fold. Trim the seam allowance to approximately 1/8" and turn right-side-out.
Fold in half to make a little loop - stitch across the bottom approx. 1 1/4" from the tip of the loop. Stitch across the two loops - trim to 1/4" seam allowance.
Open the zipper about half-way before proceeding. (Ask me why I'm reminding you of this...)
Fold the remaining edge as shown - zipper on one fold, center of bag on the other. Insert the loop into the bag and pin in place approx. 1" away from the zipper-fold. (It doesn't need to be exact, but it's where the pin is in the first picture.)
Using a 3/8" seam allowance, stitch across the opening. Go slowly across the zipper - even though there aren't any metal parts, it's still thick and it can be a little bulky. Overcast or serge - if desired.
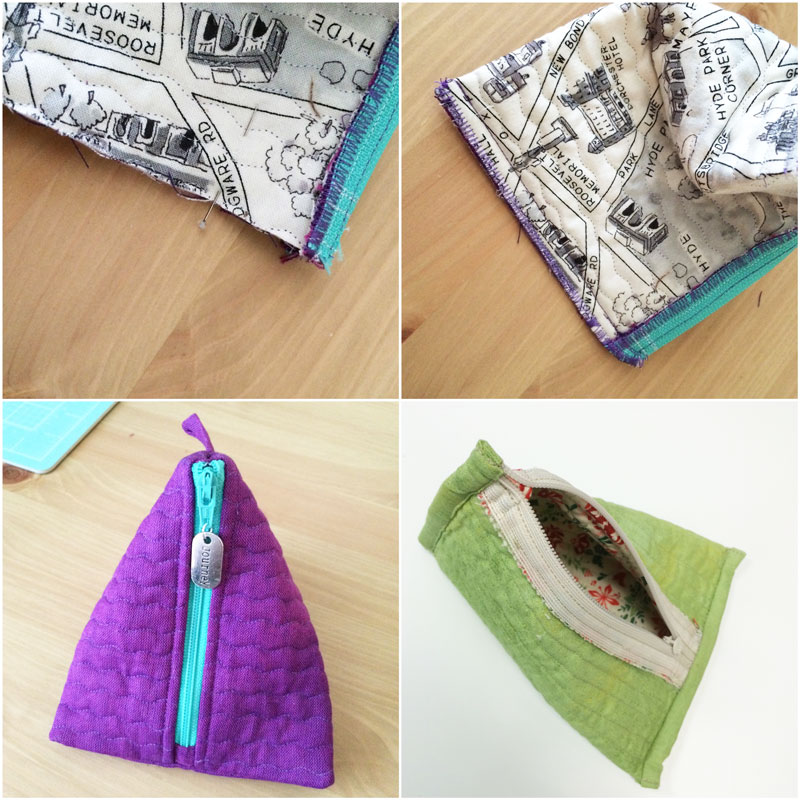
Turn the bag right side out and poke out the corners. Add a little zipper pull and presto! It's finished.
One other option to mention - I experimented with "binding" the two seams in the bag. I cut a 1 1/4" wide strip on the straight grain of the fabric. The strip was included in the seam stitching closed the opening - 3/8" seam allowance - with a 1/2" extending on each end. The ends were folded in and the strip folded over the seam. The edge was turned under along the stitching line and pinned. The edge was then machine-stitched through all the layers. It worked well and I considered doing it for the crossweave bags. But over-casting is faster... it was late... I was tired.
The zipper pulls! Both are sold as "charms" for jewelry-making and I found the charms I used in two different places. The silver button "pull" is a button charm that I found in the United Notions warehouse - this is it. The other charms came from one of the "big box" stores known for coupons - look for charms in the jewelry-making section. And don't forget to get "O" rings or split-rings to attach the charm to the zipper, and a pair of those little jewelry pliers will help.
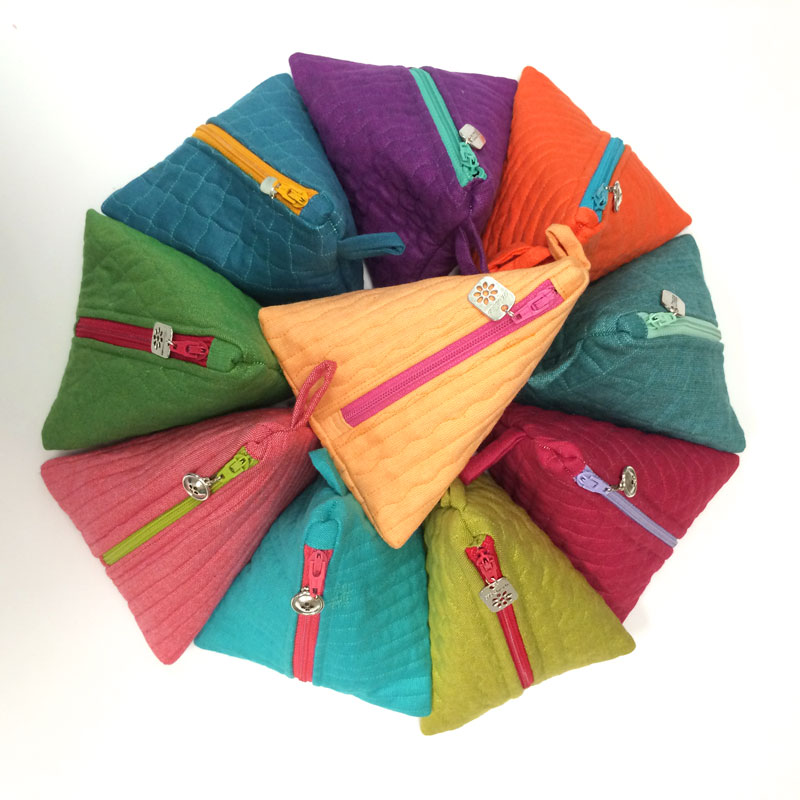
Because I've established the precedent of telling you how long these things took me to make - the bag with the bound-seams took about 1 1/2 hours to cut, quilt and assemble. The bags with the over-casting took about an hour - the first one took the longest, the last one took less than 45 minutes. The time also varied because of the quilting... and what music was playing.
That's it for the Christmas in July projects... though maybe not. While looking for the links for A Spoonful of Sugar's tutorials, I got distracted. I think I might need to make a basket... or three.
Finally, because I've been celebrating Christmas and thinking ahead about gifts... I've got a couple of things to share. Surprises. Five of them. Just leave a comment by midnight on Sunday - August 2nd - CST and one of my little packages might find it's way to your mailbox.
You just have to tell me what you'd like to find in your stocking this December.
And no, one of these little crossweave bags doesn't count. Rumor has it there's a duck coming this direction...
Have a good weekend!
Posted in:
Comments